How To Put Jimmy Choo Shoe Charm?
Jimmy Choo shoes deserve careful handling when adding a charm. A secure attachment preserves the leather and suede while avoiding damage to delicate surfaces. This guide covers choosing a compatible charm, locating secure anchors, and using the right hardware for confident charm swaps. It also addresses finish protection, comfort, and safe reuse to keep your shoes pristine.
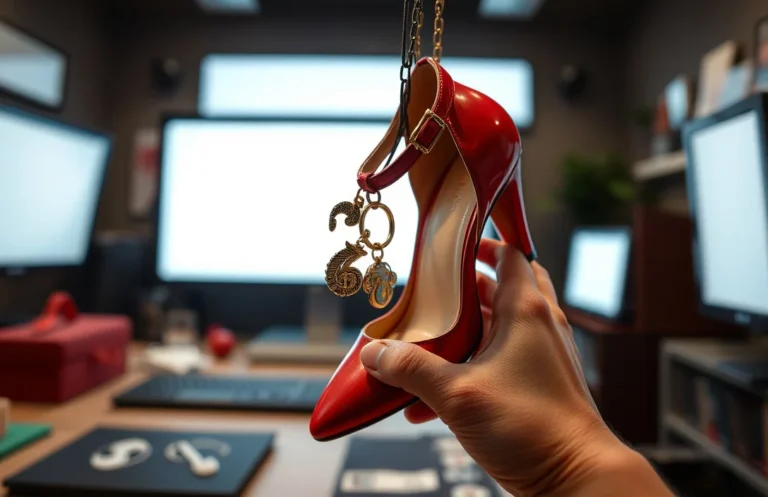
To attach a Jimmy Choo shoe charm, use a lightweight, flat-backed charm secured with a jump ring or small charm clip. Protect the leather with tape, test the fit, and verify security by taking a few steps. Reattach safely by reversing the steps.
Key Takeaways
- Lightweight first. Choose a flat-backed charm to minimize bulk and prevent pressure on delicate surfaces.
- Secure anchor. Attach to hardware that can bear weight without loosening.
- Right hardware. Use a 4-6 mm jump ring or small clip for easy removal with minimal wobble.
- Protect finish. Use tape or a leather guard before attachment to prevent scratches on suede or patent surfaces.
- Check fit. Ensure the charm sits flush and won’t snag when walking.
- Test durability. Conduct a short wear test to confirm the attachment remains secure during movement.
Choosing the Right Charm Style for Jimmy Choo
Select a charm with a flat back and lightweight design to minimize impact on the shoe. Heavy pendants or charms with protruding crystals can indent leather or suede over time. Focus on clean, low-profile designs that sit against the shoe surface without dangling into the sole area. Charms with a decorative front and a smooth back wear more gracefully and pose minimal risk of scuffing.
Ideal options include classic metal shapes, enamel accents, or simple initials that sit close to the shoe without adding bulk. Avoid charms with sharp edges or rough backs that could scratch with foot movement. A charm that is 0.8-1.5 cm wide and weighs just a few grams typically stays comfortable throughout the day. Test the charm on an old shoe or a hidden area first to ensure no surface abrasion occurs.
Materials and Tools You’ll Need
- Lightweight, flat-backed charm
- 4-6 mm jump ring or small charm clip
- Fine-nose pliers and flat-nose pliers
- Soft cloth for cleaning
- Leather-safe tape or guard for finish protection
Locating Secure Attachment Points on Heels
Identify stable areas on the shoe, such as strap edges, counter seams, or hardware on the heel tab. These spots should not bend or flex, providing a stable anchor that won’t loosen when walking. Avoid areas prone to flexing or direct contact with the sole, as these can damage the finish or loosen under load.
On many heels, the best anchors include: the edge of a strap, a small metal ring in the hardware, or a solid seam along the heel counter. If the shoe has a buckle or loop behind the ankle, these can also serve as practical attachment points. Do not anchor to the exposed toe box or soft suede areas that may deform under pressure. Test the anchor by pressing gently; it should not flex or separate.
Attaching with a Jump Ring or Charm Clip
Use a 4-6 mm jump ring or small charm clip for secure yet easy removal. Open the ring with two pliers, hook it through the chosen anchor, and close it with a firm, even squeeze. The charm should sit flush against the shoe, and the loop should be oriented to prevent rotation into the foot’s path. If using a clip, choose one with a no-snag design that grips the anchor securely.
Work in a clean, well-lit area. Clear the surface with a soft cloth to see the anchor clearly. When attaching, avoid bending the jump ring excessively; a misaligned ring can open under side pressure. Once secured, gently tug the charm to confirm it won’t rotate or detach. For best results, perform a minor movement test by walking a few steps in socks to check for pinch points.
| Hardware option | Typical use | Pros | Cons |
|---|---|---|---|
| Jump Ring 4 mm | Lightweight, low profile | Low bulk, easy to swap | Needs tool to open/close |
| Jump Ring 5 mm | Stronger hold | Better grip on moving parts | Can be visible on some designs |
| Charm Clip | Quick release | No ring manipulation required | May bulk up the edge |
Protecting Leather and Suede Finishes During Attachment
Before attaching the charm, protect the shoe finish with masking tape or a leather guard. Apply a thin strip of tape around the anchor area to prevent metal contact with delicate surfaces. For suede, use a protective patch or guard to prevent staining or scuffing. Remove the tape after confirming the charm is secured and the area is clean.
Test the protected area by gently pressing the charm and moving the anchor point. If you notice lifting or residue on the surface, remove the charm and retape as needed. For patent leather, use a soft microfiber cloth to test slides without leaving lint. Always verify the finish after completing the attachment and before wearing outdoors.
Positioning the Charm for Comfort and Aesthetic Balance
Position the charm flush against the leather, aligning it with the foot’s natural contour. Aim for symmetry, especially if you have a pair, to maintain a balanced look. For dressy outfits, align the charm with the heel line for subtle visibility while walking.
Ensure the charm does not press into the skin or catch on clothing. If it sits high or protrudes, consider a shorter attachment point or thinner charm. Test indoors by walking briefly, noting how the weight shifts with each step. A well-placed charm remains visible yet unobtrusive.
Checking Security with Movement and Wear Tests
Test the attachment by walking ten steps and twisting your foot to ensure the charm stays secure. Start slowly, then repeat on an incline to mimic real wear. If the ring opens or the charm shifts, reclose it with steady pressure and inspect the anchor for looseness.
For added assurance, conduct a short wearing test in a controlled setting. Check after a few minutes of walking for any snagging. If the charm remains secure, extend the test to longer walks around the house. If you notice looseness, remove the charm and try a different anchor or switch to a clip design that distributes weight evenly.
Removing and Reattaching Safely for Reuse
Remove the charm by reversing the attachment steps with gentle pliers to avoid scuffing. Open the ring slowly to release the anchor and slide the charm away. Inspect the anchor area for any scuffs or wear before storing the charm in a soft pouch. Reattach by repeating the steps with fresh alignment to ensure the ring closes securely.
For frequent reuse, consider installing a small, removable clip set instead of multiple rings. Clips avoid repeated ring openings, reducing the risk of wearing down the anchor. Store charms separately from shoes to prevent surface marks. When reusing, test again in a hidden area before stepping out.
Bottom line
For most Jimmy Choo heels, choose a lightweight, flat-backed charm attached to a secure strap or hardware with a small jump ring. Protect the finish with tape, and always test the fit before wear. If you swap charms often, a clip-based system allows for quicker changes without stressing the anchor.
FAQ
Can I attach a charm to any Jimmy Choo heel without damage?
Use a lightweight, flat-backed charm attached to a solid anchor like a strap edge or heel counter. Protect the finish with leather-safe tape and test in a hidden area first. If the anchor area flexes, choose a more secure hardware point or switch to a clip.
How long does it take to attach a charm the first time?
Plan about 5-10 minutes for careful attachment. Once comfortable, swaps take about 2-4 minutes with the right tools ready.
What should I avoid to protect the shoe finish?
Avoid sharp tools on leather and suede. Do not drill holes or use strong adhesives. Use masking tape or a leather guard around the anchor to prevent scratches, and test the area after attachment for transfer or staining.
What if the charm shifts or pokes when walking?
Recheck the anchor point and ensure the ring is fully closed. If shifting persists, switch to a clip that holds the charm more securely. A misaligned charm can rub against the instep, so realigning is essential.
Are there safer alternatives to hanging charms on high-end heels?
Yes. Consider removable clips that grip the strap or back of the heel, or insole charms that rest under the inner sole. These options reduce surface contact and lower the risk of scuffs while still allowing for personalization.

- How Do You Use Shoe Charms? Attach, Swap & Care In Minutes - June 24, 2026
- How To Remove Shoe Charms From Crocs? - June 24, 2026
- How Do Crocs Customizable Jibbitz Charms Enhance The Shoes? - June 24, 2026