Personalization Ideas For Sneaker Charms
Want to upgrade your sneakers? This guide shows how to make shoe charms quickly and easily. You’ll gather basic materials, choose between polymer clay, resin, or 3D printing, and apply a sealant that withstands wear. It’s DIY-friendly, with clear steps, practical tips, and budget-conscious choices.
Shoe charms are decorative pieces that attach to laces or eyelets, typically 8-12 mm thick and shaped into icons, initials, or words. With simple materials and careful finishing, you can create lasting charms in under an hour each, plus curing time for resin.
Key Takeaways
- Starter kit. Expect to spend $15-$25 on a complete kit covering clay or resin, molds, and basic tools.
- Shape limits. Keep charm shapes under 1 inch to avoid snagging on socks and laces.
- Seal early. A clear sealant or resin coat protects against wear.
- Attachment options. Use jump rings, eyelets, or lace integration for secure wear.
- Cure times. Resin charms need 24 hours to fully cure for durability.
Materials and Tools for DIY Shoe Charms
A complete kit includes polymer clay or resin, molds, a heat tool or oven, jewelry findings, and basic hand tools. You’ll also need pliers, a ceramic tile or glass pad for work, and safety gear like gloves and goggles. The exact items depend on your method, but the core lineup remains consistent: shaping material, a way to form shapes, and a reliable finish.
Polymer clay and resin each have distinct workflows. Polymer clay bakes in a standard or dedicated oven and can be sanded and buffed. Resin, whether epoxy or UV-cured, delivers a glossy surface and precise detail but requires molds and proper curing space. If you prefer to skip baking or curing risks, 3D printing offers a method using a home printer and post-processing like sanding and sealing. You’ll also need silicone molds, acetone or isopropyl alcohol for cleaning, and a fine file.
Essential starter items
- Polymer clay or resin for base charms
- Silicone molds in small, sneaker-appropriate shapes
- Jump rings and eyelets for attachment
- Jewelry pliers, side cutters, and a small file
- Clear sealant or resin for finishing
- Fine sandpaper, toothpicks, and a craft knife
Designing Charm Shapes for Sneakers
Keep shapes under 25 mm and avoid sharp edges to prevent snagging. Start with simple silhouettes like arrows, hearts, initials, or sports icons. Outline each charm on paper, then translate the shape into a mold or 3D model with a hole for lacing or a jump ring. This planning saves time and reduces breakage.
Map out how many charms you’ll wear per pair and how they’ll sit along the lace line. Simple geometric shapes read clearly from a distance and look cleaner when scaled to 20-25 mm. If you plan to mix colors, decide your palette ahead of time to reduce color bleed and simplify finishing.
Design tips
- Start with one or two shapes you love and expand from there.
- Use bold contrasts for visibility from a distance.
- Add a hole or small loop at the top for attachment.
- Consider the weight of your design to prevent sagging.
- Sketch variants on graph paper before committing to a mold or print.
Choosing Charm Production Resin, Clay, or 3D Print
Resin, clay, and 3D printing are the three most accessible methods for creating consistent charms. Each method has its trade-offs: resin offers a glassy finish with fine detail but requires molds and a curing space; polymer clay is forgiving and bake-friendly but can crack if too thick; 3D printing enables exact replication but requires a printer and post-processing. Use the table below to compare options.
| Option | Pros | Cons | Best For |
|---|---|---|---|
| Resin-based charms | High detail, glassy finish, durable | Requires molds, curing space, and gloves | Complex shapes, multiple copies |
| Polymer clay | Easy to shape, bake in home oven, inexpensive | Can crack if too thick; needs sealing | Simple, thick shapes and fast turnaround |
| 3D printed charms | Precise shapes, perfect replication, no molds | Requires printer and post-processing | Complex geometries and quick scaling |
Most beginners start with polymer clay for its forgiving handling and low cost. Resin charms suit those who want maximum detail and a glossy surface once they’re comfortable with mold making and curing. 3D printing is ideal for exact symmetry or reproducing a batch of designs with minimal manual shaping.
Attaching Charms to Laces and Shoes
Attach charms using small jump rings or by threading laces through a charm with a built-in hole. Choose a charm design with a centered hole or loop at the top. Open the jump ring with pliers, hook it through the hole, and close it securely. For a more integrated look, thread the lace through the charm hole above the aglet and secure with a tight knot.
For example, thread a charm with a built-in hole onto the lace near the toe area, then loop a 1.5 mm jump ring through the hole and close it with pliers. This method prevents sliding and reduces snag risk. Alternatively, attach at the lace tip with a small bead or stopper along with a jump ring to hold the charm in place.
Attachment methods
- Lace tips: thread a charm with a hole near the lace tip and secure with a small bead stopper.
- Jump rings: connect a charm to a lace segment using a 1.5-2 mm jump ring.
- Eyelets: anchor a charm to an eyelet loop with a tiny ring or connector.
- In-lace loop: design a charm with a built-in loop for direct lace threading.
- Adhesive-backed charms: use only for temporary wear or areas without flex; check compatibility with fabric.
Secure wear balances ease of adjustment with durability. For daily wear, using a combination approach – lacing through a hole for everyday use and swapping charms weekly – keeps things fresh without stressing the laces.
Finishing and Sealing for Durability
Finish with a clear sealant or resin layer to protect against wear and moisture. Light sanding between coats removes tool marks and yields a smooth surface. If using resin, ensure proper ventilation and wear gloves; cure in a dust-free area. For polymer clay, a thin layer of sealer adds gloss and guards against color fading.
Two finishing passes usually work best. First, apply a light coat to seal the surface; second, add a thicker top coat for gloss and protection. Allow adequate cure times between coats according to product instructions. If you see micro-pitting or tiny air bubbles, a gentle heat pass with a clean tool can smooth the surface, followed by a final sealant layer.
Finishing steps
- Sand edges to remove sharp corners and create a smooth transition.
- Apply thin, even coats of sealant; avoid puddling.
- Allow each coat to cure fully before the next.
- Use a final gloss layer for a water-resistant, durable finish.
Durable results come from patience. Rushing through sealant layers invites imperfections that look unprofessional and wear off quickly.
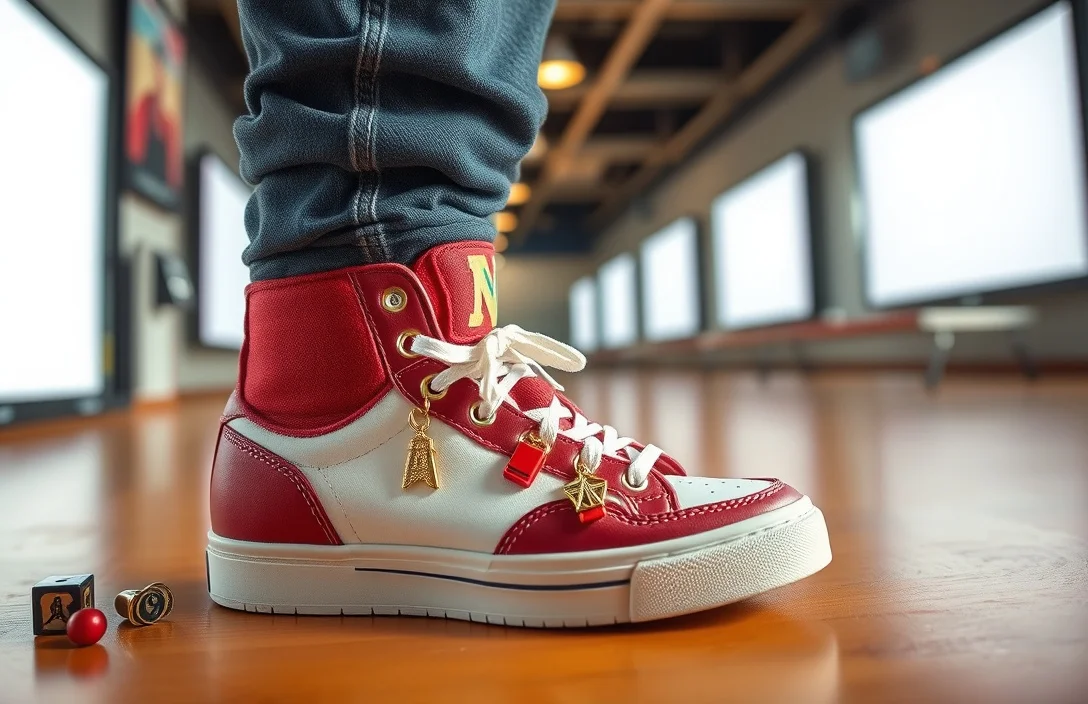
Personalization Ideas for Sneaker Charms
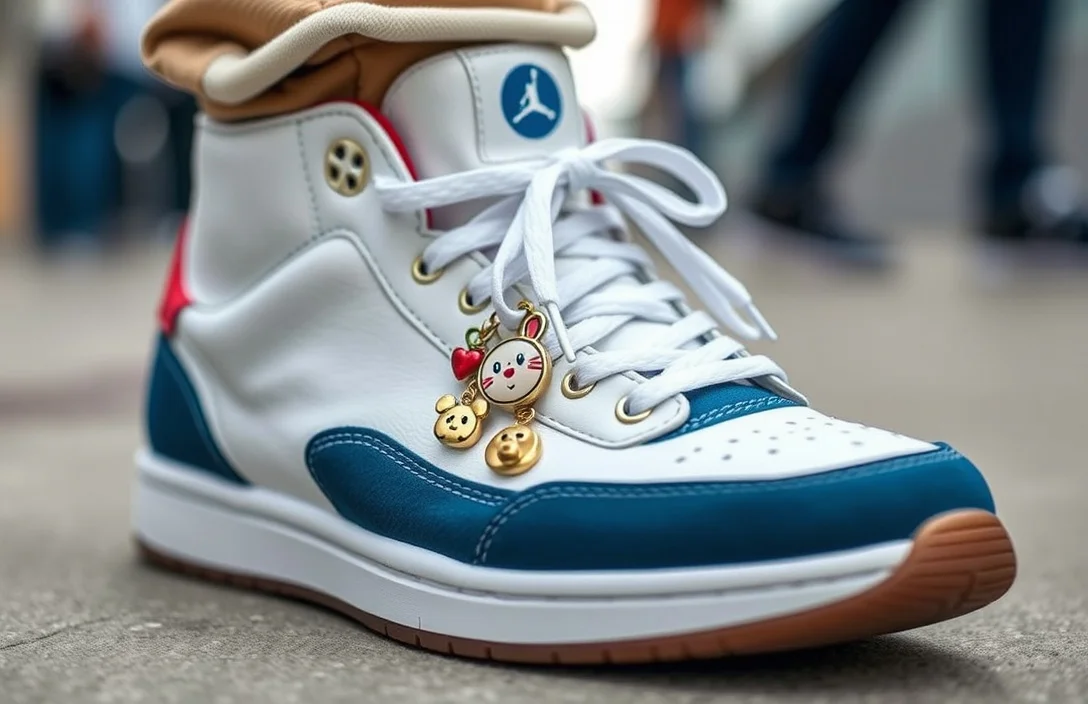
Color, symbols, and textures add personality to your charms. Start with a color theme that matches your sneakers or wardrobe, then add a few accent elements for variety. Chic combos pair metallic finishes with bold enamel colors for high contrast. Create symbols reflecting hobbies, places, or favorite quotes for story-driven charms.
Ideas to try
- Monogram initials in a contrasting color
- Symbols like hearts, stars, arrows, or lightning bolts
- Mini sport or music icons that reflect your hobbies
- Seasonal motifs (e.g., pumpkins for fall, snowflakes for winter)
- Word charms with short phrases or your nickname
- Mixed materials like a resin body with a metal inset or glitter accents
A well-curated set of 6-8 charms lets you mix and match across sneakers and outfits. Keep at least one neutral piece for versatility.
Safety and Care for Your Charms
Safety begins with fully curing resin and sealing edges to avoid skin contact and edge wear. Handle sharp edges carefully during shaping, and keep solvents away from kids and pets. Store charms in a dry, dust-free container to prevent surface abrasion and color fading. Regular inspections help catch cracks or loose rings before they fail during wear.
Care basics
- Wear gloves when shaping resin to protect your hands.
- Ensure cures are complete before handling or attaching to shoes.
- Wipe surfaces with a soft cloth to avoid scratching the finish.
- Keep charms dry and away from direct heat when not in use.
- Reapply sealant every few months for long-term durability.
The best care routine is simple: a quick wipe after wearing, a lightweight polish as needed, and a periodic sealant refresh to maintain a like-new look.
FAQ
How much does it cost to start making shoe charms?
A starter setup costs about $15-$25 for basic polymer clay or resin kits, plus a few dollars per charm for molds and findings, keeping entry affordable as you explore shapes.
How long does a resin charm take to cure?
Curing times vary, but most UV or epoxy resins reach handling strength in 24 hours and fully cure within 48 hours. Plan for at least a day between shaping and wearing.
Can I wash sneakers with charms attached?
Yes, but protect the charms by removing them if you’ll scrub aggressively or soak the shoes. Gentle hand washing and air drying help preserve finishes and attachments.
What’s the best way to attach charms to laces?
Thread the lace through a charm with a hole or loop, then secure with a small jump ring or bead stopper. This minimizes movement and loosening during wear.
What should I do if a charm breaks?
Assess the break, file any rough edges, and reattach with a new jump ring or a repaired loop. If a resin charm cracks, consider replacing it or remolding a new piece with a reinforced hole.
You now have a clear path to create sneaker charms that stay put and look sharp. Start with a small batch using polymer clay to learn the basics, then transition to resin or 3D printed designs for finer detail. Collect a few reliable molds, build a mini kit, and schedule dedicated crafting sessions each week to expand your collection.
- How Do Shoe Charms Work? Explained Simply - June 24, 2026
- How To Install Jibbitz Shoe Charms? - June 24, 2026
- Personalization Ideas For Sneaker Charms - June 24, 2026